Quick setup
Create a widget for one of your smart home devices, then put it on a webpage. Takes about five minutes. This guide assumes HArvest is already installed.
Create your first widget
From the HArvest panel dashboard, click + Create Widget in the bottom-right corner. This opens the four-step wizard.
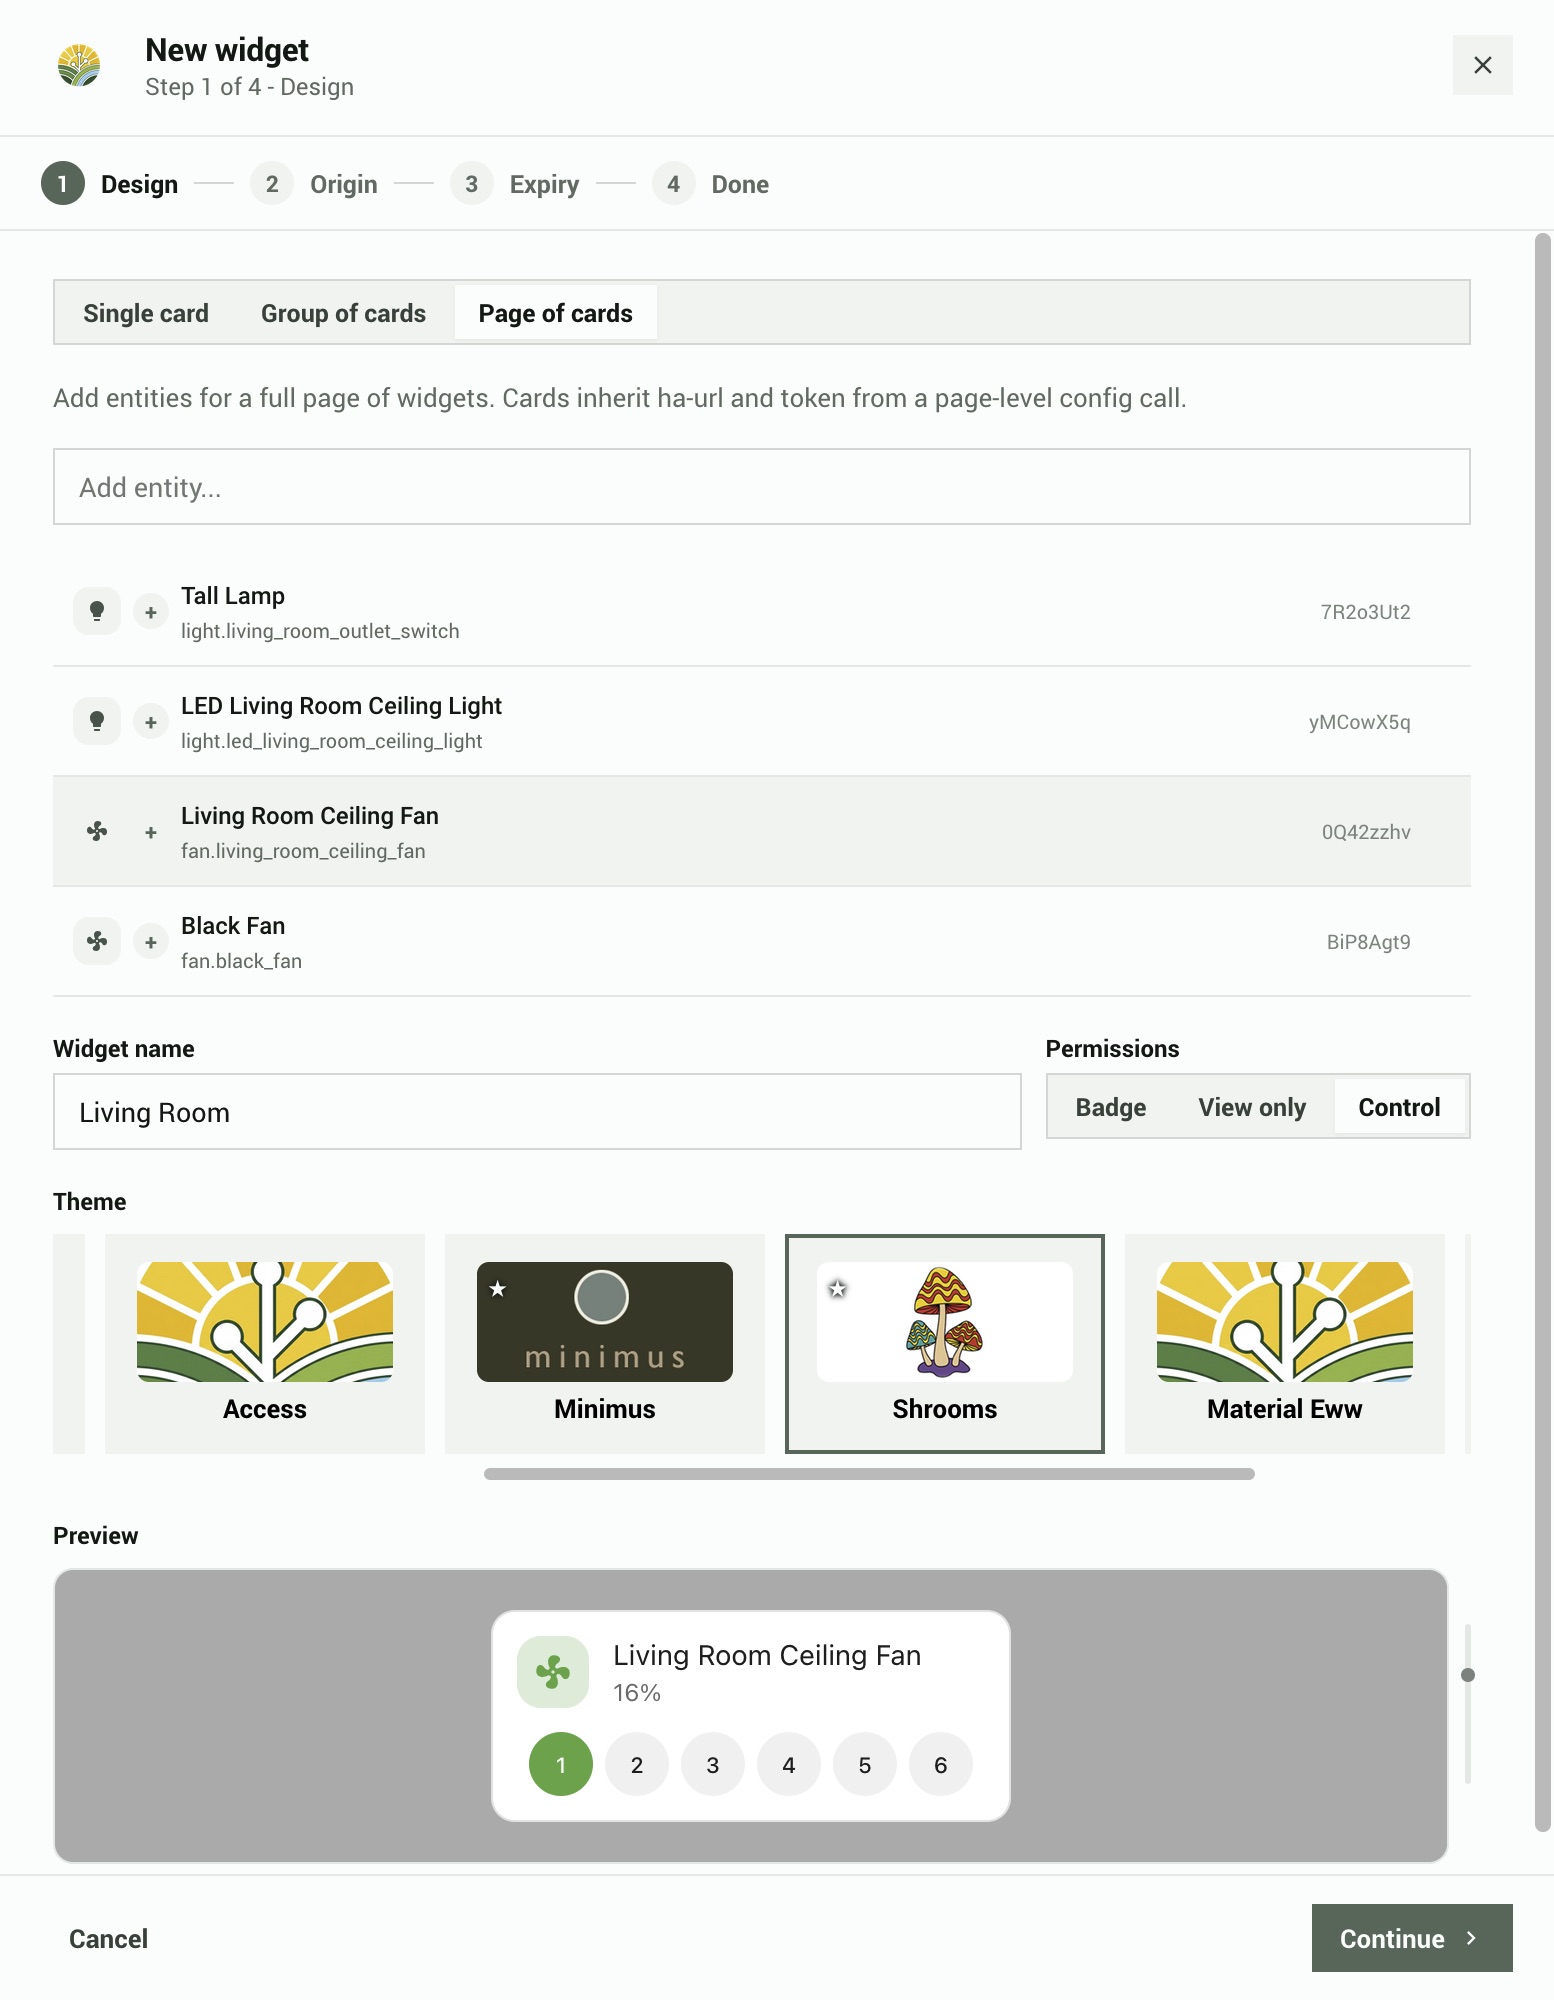
Step 1 - Design
Search for the entity you want to embed. The search matches entity IDs and friendly names, for example "Bedroom light" or light.bedroom_main.
- Click an entity to add it. Each one becomes its own card on your page.
- Optionally add companion entities using the [+] button on each row. These are small secondary indicators that appear inside another card, for example a motion sensor pill inside a light card.
- Give the widget a name for your own reference. Visitors to your page never see it.
- Set permissions: Badge (a compact pill showing icon, name, and state - ideal for status displays), View only (full card, visitors see state but cannot change anything), or Control (full card, visitors can also interact, for example toggling a light). You can override this per entity later from the widget detail screen. When Badge is selected, companion pickers are hidden.
- Pick a visual theme from the theme strip. You can change the theme later from the widget detail screen.
A live preview of your selected entity appears as you configure it, updating in real time when you change the permission level or theme.
Step 2 - Set origin
Specify which website is allowed to use this widget. This prevents someone from copying your embed code and using it on a different site.
Enter your site URL (e.g. https://mysite.com) or choose Any website if you don't need this restriction. For widgets that allow control, setting an origin is strongly recommended.
Step 3 - Set expiry
Choose when the widget expires: never, 30 days, 90 days, 365 days, or a custom date. An expired widget can be renewed from the panel at any time.
The Advanced section has additional options you can skip for now:
- Access schedule - limit the widget to specific days and hours (e.g. business hours only).
- IP restrictions - limit connections to specific network ranges.
- HMAC signing - adds a shared secret that the page must prove it knows before connecting. Useful for high-security widgets. See the security page for details.
Click Generate to create the widget.
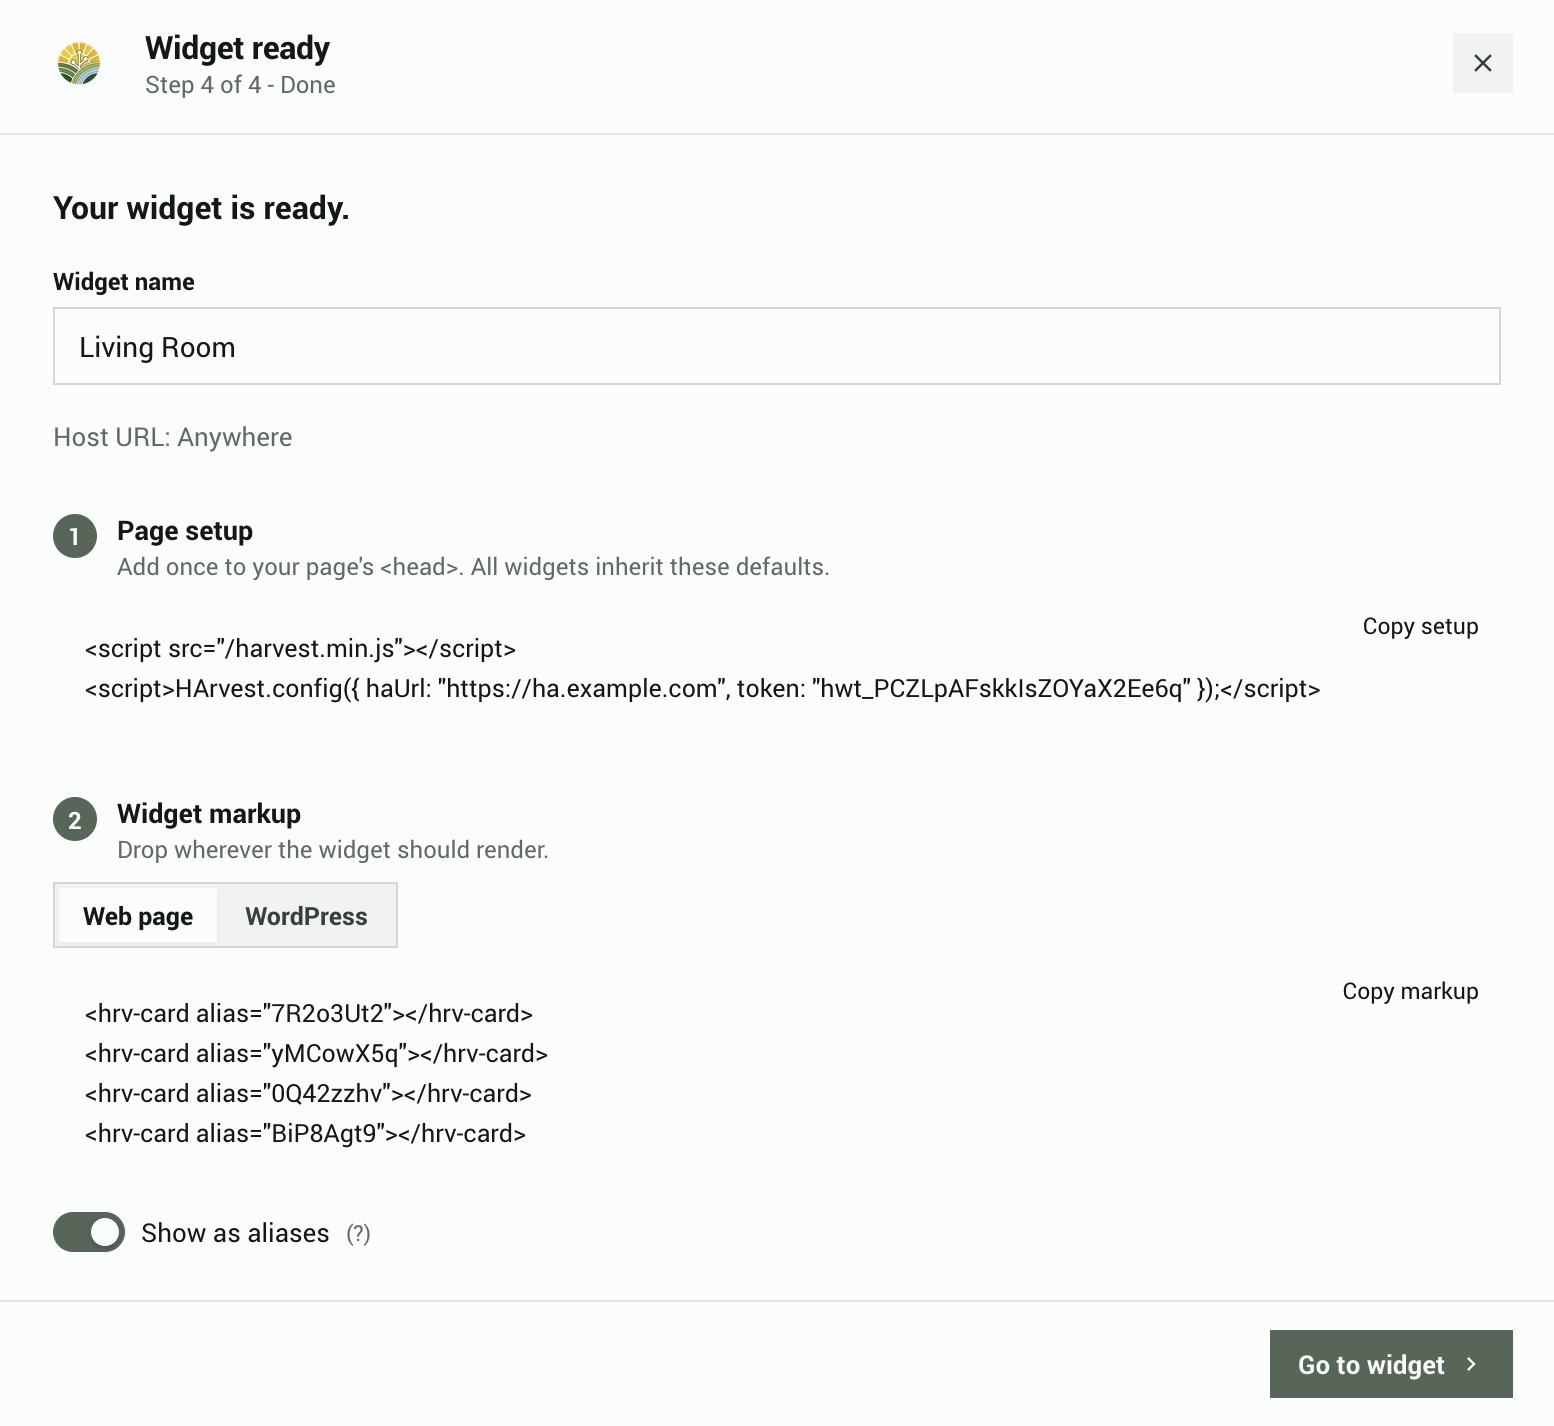
Step 4 - Get the code
The wizard shows a ready-to-paste code snippet. Use the tabs to switch between plain HTML and WordPress shortcode format.
There is also a toggle to use aliases instead of real entity IDs. An alias is a short random code like dJ5x3Apd that stands in for light.bedroom_main, so visitors cannot see your actual Home Assistant entity IDs in the page source.
Copy the snippet and paste it into your page. That's it.
Embed on a plain HTML page
The snippet has two parts. First, a one-time setup block that loads the widget script and tells it where your Home Assistant instance is. Second, one <hrv-card> tag for each entity you want to show.
<!-- Part 1: Load the script and connect to your HA instance (once per page) -->
<script src="https://myhome.duckdns.org/harvest_assets/harvest.min.js"></script>
<script>
  HArvest.config({
    haUrl: "https://myhome.duckdns.org",
    token: "hwt_a3F9bC2d114eF5A6b7c8dE",
  });
</script>

<!-- Part 2: Place cards anywhere in your page -->
<hrv-card entity="light.bedroom_main"></hrv-card>
<hrv-card entity="sensor.outdoor_temp"></hrv-card>
The setup block only needs to appear once, no matter how many cards you add. Place <hrv-card> tags anywhere in the page body where you want a widget to appear.
The script URL points at your Home Assistant instance. The HArvest integration serves the widget bundle directly out of its own files at /harvest_assets/harvest.min.js. This means the widget always matches the running integration version - update HArvest via HACS and every embedded widget picks up the new bundle on the next page load. No separate widget upload, no CDN, no version drift.
The HArvest.config() call sets a page-level default. If you need cards from different tokens on the same page, you can set token and ha-url directly on individual cards or card groups instead. See token configuration levels in the widget reference.
Embed on WordPress
If you use WordPress, the wizard generates a shortcode instead of raw HTML. A shortcode is a small tag that WordPress replaces with the widget when the page loads.
[harvest token="hwt_a3F9bC2d114eF5A6b7c8dE" entity="light.bedroom_main"]Paste it into any post or page using the Classic Editor or any editor that allows shortcodes. The HArvest WordPress plugin takes care of the rest: loading the widget script, setting up browser security headers, and matching your site's light or dark mode.
The plugin needs to be installed and configured with your HA URL before shortcodes will work. Download the latest release zip from GitHub Releases and find harvest.zip in the wordpress/ folder. See the WordPress setup page for the full install process.
The Dashboard Converter tool can automatically convert an existing HA dashboard into an HArvest HTML page. It connects to your HA instance, pulls the dashboard config, creates tokens, and generates a complete HTML file preserving your tab layout, sections, and badges. Find it in the tools/ folder: python tools/lovelace_convert.py
The Panel guide covers everything you can do from the HArvest panel: display settings, security options, activity logs, and more. The Widget reference has all embed options and the JavaScript API.